

Manage Rollout
Rollout Setup Checklist
Understanding the compliance checklist and completing each configuration item.
After creating a rollout, you’ll see the Rollout Checklist page. This is your rollout’s main dashboard — it shows what needs to be configured before your rollout is ready for releasing versions.
Accessing the Checklist
Navigate to your rollout from the Rollout Select page. The checklist is the default landing page for any rollout, located at:
/beta/rollouts/{askId}/{rolloutName}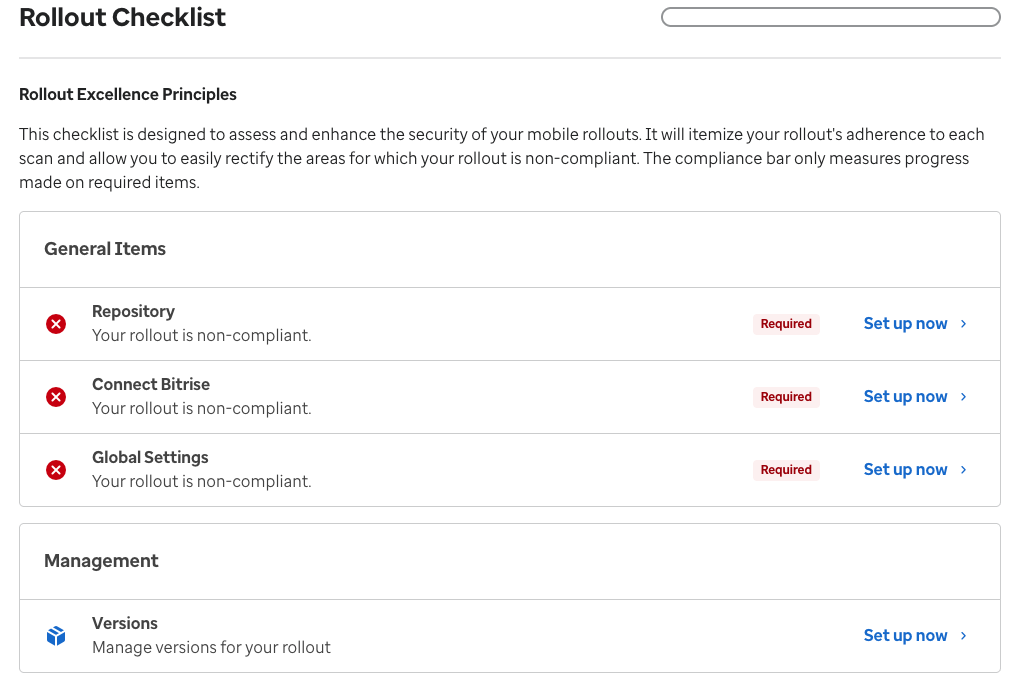
The Rollout Checklist page showing configuration status for each item
Checklist Items
The checklist is divided into items, each representing a configuration requirement. Items show as complete (green check) or incomplete (empty circle) based on whether the requirement is satisfied.
1. Repository
What it checks: A source code repository is connected to your rollout.
-
Click the repository checklist item
A dialog opens where you can search for your GitHub repository.
-
Search for and select your repository
Type your repository name to filter results, then select it.
The repository connection dialog -
Confirm the connection
Click Confirm to link the repository to your rollout.
2. Global Settings
What it checks: Required metadata fields are filled in for your rollout’s global configuration.
The following fields must be set:
| Field | Description |
|---|---|
| Support URL | Link to your app’s support page |
| Marketing URL | Link to your app’s marketing page |
| Privacy Policy URL | Link to your app’s privacy policy |
| Copyright | Copyright notice for your app |
-
Open Global Settings
Click “Settings” on the checklist page, or navigate to the Global Settings page directly.
-
Go to the Global tab
Select the Global tab if it’s not already selected.
-
Fill in the required fields
Enter the Support URL, Marketing URL, Privacy Policy URL, and Copyright fields.
-
Save
Click Save in the top-right corner.
See Settings for detailed instructions on all configuration options.
3. Bitrise Integration
What it checks: Your rollout is connected to Bitrise for CI/CD and Release Management.
Two values must be configured:
| Field | Description | Where to Find It |
|---|---|---|
| Bitrise App Slug | Identifies your app in Bitrise CI | Visible in the URL at app.bitrise.io/app/{app-slug} |
| Bitrise Project ID | Identifies your project in Bitrise Release Management | Found in Bitrise Release Management settings |
-
Navigate to rollout settings
Go to the rollout settings page.
-
Enter Bitrise App Slug and Project ID
Fill in both fields with the values from your Bitrise project.
-
Save the configuration
Click Save to confirm.
4. Approver Mappings
What it checks: All six approval roles have assigned reviewers.
| Role | Source |
|---|---|
| Legal | Assigned from system configuration |
| ESRO | Assigned from system configuration |
| OSPO | Assigned from system configuration (automated) |
| Service Owner | Pulled from your application record |
| Technical Owner | Pulled from your application record |
| Product Owner | Pulled from your application record |
- System approvers (Legal, ESRO, OSPO) are pre-configured — no action needed
- Business approvers (Service Owner, Technical Owner, Product Owner) are automatically pulled from your application record in the Immerse application registry
Checklist Status
| Status | Meaning |
|---|---|
| All items complete | Your rollout is configured and ready — you can create versions |
| Some items incomplete | Review the incomplete items and follow the steps above to resolve them |
Navigation from the Checklist
From the checklist page, you can:
- Click “Settings” to manage rollout name and repository configuration
- Click individual checklist items to view details or take action
- Navigate to Versions to see or create versions for this rollout
What’s Next
- Settings — Set up global settings and app store configuration
- Create Version — Start your first release